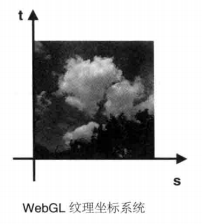
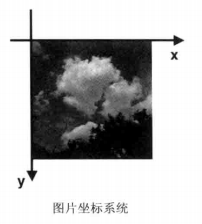
WebGL坐标系统和纹理坐标 1.WebGL坐标系统: 先简单的认为是右手坐标系。
x轴最左边为-1,最右边为1;
y轴最下边为-1,最上边为1;
z轴朝向你的方向最大值为1,远离你的方向最大值为-1;
2.纹理坐标 WebGL使用s和t命名纹理坐标(st坐标系统)。(还有以uv命名)
纹理图像四个角坐标为:左下(0.0,0.0),左上(0.0,1.0),右上(1.0,1.0),右下(1.0,0.0)。纹理坐标与图像自身尺寸无关,其右上角坐标始终是(1.0,1.0)。
讲纹理坐标与顶点坐标相对应,来确定怎样将纹理图像显示到相应的几何顶点坐标之间。
3.取样器变量 基本取样器类型: sampler2D 与 sampleCube 只能是uniform变量。
数量受着色器支持的纹理单元最大数量限制。
纹理使用 1.着色器实现 1 2 3 4 5 6 7 8 9 10 11 12 13 14 15 16 17 18 19 20 21 let VSHADER_SOURCE = 'attribute vec4 a_Position;\n' + 'attribute vec2 a_TexCoord;\n' + 'varying vec2 v_TexCoord;\n' + 'void main() {\n' + ' gl_Position = a_Position;\n' + ' v_TexCoord = a_TexCoord;\n' + '}\n' ; let FSHADER_SOURCE = 'precision mediump float;\n' + 'uniform sampler2D u_Sampler;\n' + 'varying vec2 v_TexCoord;\n' + 'void main() {\n' + ' gl_FragColor = texture2D(u_Sampler, v_TexCoord);\n' + '}\n' ; let a_Position = gl.getAttribLocation(gl.program, "a_Position" );let a_PointSize = gl.getAttribLocation(gl.program, "a_PointSize" );let a_TexCoord = gl.getAttribLocation(gl.program, "a_TexCoord" );let u_Sampler = gl.getUniformLocation(gl.program, "u_Sampler" );
顶点着色器中接受纹理坐标a_TexCoord,光栅化后传递给片元着色器。
片元着色器中获取纹理像素(纹素)颜色。使用GLSL ES中:
texture2D(sampler2D sampler, vec2 coord)``` 1 2 3 4 5 6 7 8 9 10 11 12 13 14 15 16 17 18 19 20 21 22 23 24 25 26 27 28 29 30 31 32 33 34 35 36 37 38 39 40 从sampler指定的纹理上获取coord指定的纹理坐标处的像素。 **参数:** sampler > 纹理单元编号(texture unit number)。专用于纹理的数据类型```sampler2D```:绑定到```gl.TEXTURE_2D```的纹理数据类型 coord > 纹理坐标。 **返回值:** > 纹理坐标处的像素颜色值。格式由```gl.texImage2D()```的internalformat参数决定。 纹理放大缩小方法的参数决定WebGL系统将以何种方式内插处片元。将```texture2D()```函数返回值赋值给```gl_FragColor```,即片元着色器将当前片元染成这个颜色。最终画出纹理。 #### 2.设置纹理坐标 向顶点着色器传入顶点坐标,在光栅化后传递给片元着色器。 ```javascript //顶点坐标、顶点尺寸、纹理坐标 let verticesSizeColorTexCoords = new Float32Array([ -0.5, 0.5, 10.0, 0.0, 1.0, -0.5, -0.5, 20.0, 0.0, 0.0, 0.5, 0.5, 30.0, 1.0, 1.0, 0.5, -0.5, 40.0, 1.0, 0.0 ]) let vertexSizeColorTexCoordBuffer = gl.createBuffer(); gl.bindBuffer(gl.ARRAY_BUFFER,vertexSizeColorTexCoordBuffer); gl.bufferData(gl.ARRAY_BUFFER, verticesSizeColorTexCoords, gl.STATIC_DRAW); let FSIZE = this.verticesSizeColorTexCoords.BYTES_PER_ELEMENT; gl.vertexAttribPointer(this.a_Position, 2, gl.FLOAT, false, FSIZE * 5, 0); gl.enableVertexAttribArray(this.a_Position); gl.vertexAttribPointer( this.a_PointSize, 1, gl.FLOAT, false, FSIZE * 5, FSIZE * 2 ); gl.enableVertexAttribArray(this.a_PointSize); gl.vertexAttribPointer(this.a_TexCoord, 2, gl.FLOAT, false, FSIZE * 5, FSIZE * 3); gl.enableVertexAttribArray(this.a_TexCoord);
3.配置加载纹理
创建纹理对象。纹理对象用来管理WebGL系统中的纹理。
1 2 let texture = gl.createTexture();
加载纹理图像。使用Image对象1 2 3 4 5 6 7 8 let image = new Image();image.onload = () => loadTexture(gl, texture, u_Sampler, image); }; image.src = require ("@/assets/sky.jpg" );
配置纹理。(loadTexture())
图像Y轴反转 WebGL中st坐标系统与PNG,BMP,JPG等图片格式坐标系统y轴相反。
WebGLRenderingContext.pixelStorei()
激活纹理单元(texture unit)
WebGL使用纹理单元 来同时使用多个纹理。每个纹理单元有一个单元编号 ,内置变量gl.TEXTURE0 gl.TEXTURE1 gl.TEXTURE2 ...各表示一个纹理单元。
WebGLRenderingContext.activeTexture()
绑定纹理对象
同缓冲区很像,对缓冲区操作前,要先绑定缓冲区对象至一个target上。对纹理对象操作前需要绑定到纹理绑定点(目标)(gl.TEXTURE_2D)。没法直接操作纹理对象,必须通过将纹理对象绑定到纹理单元上,然后操作纹理单元操作纹理对象
WebGLRenderingContext.bindTexture()
该方法完成俩任务:开启纹理对象,以及将纹理对象绑定到纹理单元上
配置纹理对象参数
设置纹理图像映射到图形上的方式。1.如何根据纹理坐标获取纹素。2.按那种方式重复。
WebGLRenderingContext.texParameter fi
将图像分配给纹理对象
示例使用JPG格式纹理图片,该格式像素使用RGB三个分量表示。texImage2D方法将图像存储在WebGL的纹理对象中。通过internalformat参数告诉WebGL纹理图像格式类型。internalformat必须与format指定纹理图像数据格式一致。
WebGLRenderingContext.texImage2D()
将纹理单元传递给片元着色器
通过第二个参数指定纹理单元编号(gl.TEXTURE0中的0 )将纹理对象传给u_Sampler。
WebGLRenderingContext.uniform[1234][fi][v]
1 2 3 4 5 6 7 8 9 10 11 12 13 14 loadTexture(gl, texture, u_Sampler, image) { gl.pixelStorei(gl.UNPACK_FLIP_Y_WEBGL, 1 ); gl.activeTexture(gl.TEXTURE0); gl.bindTexture(gl.TEXTURE_2D, texture); gl.texParameteri(gl.TEXTURE_2D, gl.TEXTURE_MIN_FILTER, gl.LINEAR); gl.texImage2D(gl.TEXTURE_2D, 0 , gl.RGB, gl.RGB, gl.UNSIGNED_BYTE, image); gl.uniform1i(u_Sampler, 0 ); }

